-->

Human Factors in Aviation. Are Pilotless Planes The Future of Air Travel?

As technology progresses faster and faster in the modern world, there are many processes that are becoming automated. So where do human factors in aviation sit in an increasingly automated world?

What are human factors?

Even with automated tasks and processes, humans still need to either control, manage, intervene, or interact with technology at many stages.

Human Factors in its widest definition describes all the many aspects of human performance which interact with their environment to influence the outcome of events. These may be related to either the physiological or psychological aspects of human capability. Both of which are able to directly affect the way in which the human operator performs in different circumstances.

Human Factors knowledge reduces the likelihood of errors, and builds more error tolerant and more resilient systems.

What are the effects of human factors in aviation?

Things have changed a lot from when we had to manually start an aircraft’s propeller. And also from when pilots had to exclusively use landmarks to visually navigate during flight. But even with all of the latest technology installed in aircraft, human factors still play an enormous role.

The human factors involved in the operation and interpretation of even the most modern technology remain of the utmost importance in ensuring the safety of aircraft operations.

Negative human factor impacts

Most of the world’s worst aviation disasters have been a direct result of human factors, including the following. An example of this is the Tenerife disaster in 1977. A runway collision between two B747 airliners, due to misinterpreted radio communication form the captain of one of the aircraft. It resulted in 583 casualties.

There are examples of failed interactions between humans and technology. One such incident is the mid-air collision between a chartered Tu-154 passenger flight and a B757 DHL cargo jet over Überlingen, Germany in 2002.  This resulted from ambiguous air traffic control and TCAS (traffic collision avoidance system) instructions. The automated TCAS instructions were in fact correct in warning the pilots of nearby traffic. It directed them to change their respective altitudes accordingly. The intervention of a fatigued air traffic controller however, who was unable to access the full scope of information he needed, resulted in the TCAS instructions being ignored, and the aircraft collided.
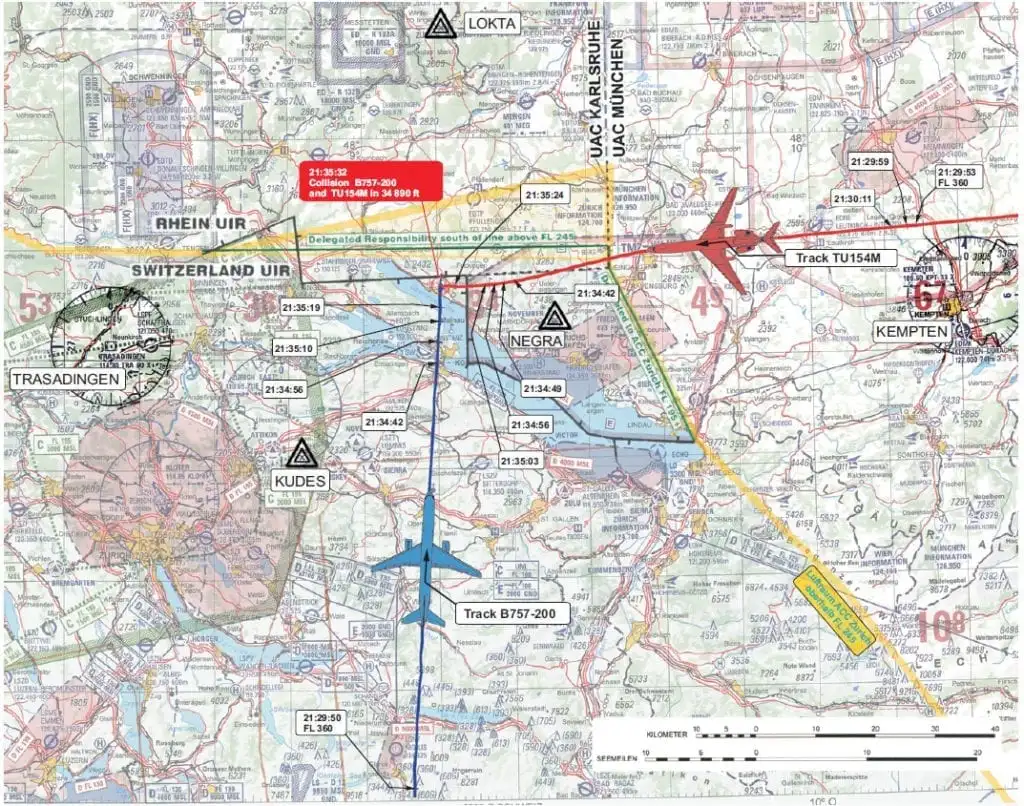
Human-Factors-Aviation-Accident
The Uberlingen disaster was a combination of automation and human factors in aviation.

Positive human factor impacts

Whilst human factors such as stress, fatigue and psychology can no doubt be discussed in relation to negative impacts on aviation, there are many situations where human factors are essential to the safe operation of a flight.

Most technology still requires a human to either operate it, manage it or translate it. In flight in particular, there are so many variables that at this stage it is very difficult to rely entirely on an automated system to make decisions.

A perfect example of the above lies in the recent tragedies involving Boeing 737MAX aircraft. This led to the grounding of the aircraft globally while software systems were checked and upgraded. There is evidence to support that the failing system was overridden by a pilot on the LionAir aircraft during flight the day before the subsequent accident occurred.

Investigation into human factors decisions that have proven to be efficient in breaking a chain of events that would have led to an accident is very important in improving aviation safety overall. This is helping to develop better technology.

Would you trust flying in an entirely automated aircraft?

The only way to eliminate human factors in aviation contributing to accidents is to completely eliminate human involvement. In other words, become 100% automated. But is this feasible, and would you trust an entirely automated aircraft?

The use of commercial and military drones shows the technology for pilotless plane travel exists and is in regular use. But whilst the world’s most common types of passenger aircraft rely heavily on computers to execute the commands of pilots and crew, a completely unmanned flight poses many potential issues.

Would there be teams of pilots on the ground controlling the aircraft? Who is in charge of the plane when it is in the air, and what would happen if an emergency situation with a passenger on board occurred?

It is incredibly difficult to think of scenarios that would not require human involvement at some level. Therefore, human factors are still relevant at some point in the process.

What do pilots think?

Naturally, pilots are concerned about flight safety. Steve Landells, flight safety specialist for the British Airline Pilots Association, says:

“Automation in the cockpit is not a new thing – it already supports operations. However, every single day pilots have to intervene when the automatics don’t do what they’re supposed to. While moving pilots to a control tower on the ground might eventually save airlines money, there would need to be huge investment to make this possible, and even more to make it safe.”

Where do human factors fit in the future of aviation?

Negative human factor influences may be accountable for most aviation accidents. But how many accidents have been avoided through positive human factor intervention?

The study of human factors in relation to aviation is incredibly important to maintain and improve the safety of flight operations in today’s world, as well as for the future of air travel.

With technology accelerating and offering more in the way of automation, the nature of the relationship between human factors and aviation will continue to change. Human management, interaction and involvement with technology and automated processes in aviation now is no less crucial than it was in the management of fully manual processes in the past.

We have developed our own Human Factors Awareness Training course, that all of our staff attend. This course is also open external applicants who want to learn more about human factors in aviation. To learn more, chat to one of our flight training specialists. Email [email protected]/en or go to https://drift.me/learntofly/meeting to book a meeting and school tour.

Learn-To-Fly-Melbourne-Youtube-Subscribe-Footer

Tips On How To Pass Pilot Theory Exams

I know nothing grabs your attention like the words ‘exams’ and ‘theory.’  Here I will give you the scoop on what to expect, and provide some tips on how to pass pilot theory exams.

No matter which course you have enrolled in, you need to study –  so let’s get pumped for pilot training exam preparation!

Aviation is a complex and sophisticated profession. Airlines are not looking for cowboys and hotshots, but well-rounded, intelligent statesmen and women. The purpose of this post is to remind you of the importance of approaching the exam runway carefully.

I’m in the fortunate position of having completed all seven of my CPL subjects (woo-hoo!). I have already passed my RPL and PPL exams. I’m not here to brag, but instead, offer my experiences to help you.

Let’s separate the post into three sections: Recreational Pilot Licence, Private Pilot Licence and Commercial Pilot Licence.

Recreational Pilot Licence (RPL) Theory Exam

First of all, congratulations on embarking on a dazzling journey in aviation. But before you hit the cockpit, you need to hit the books! Study is the best way to get your career off the ground. The RPL theory and subsequent RPL(A) theory exam covers:

Basic Aeronautical Knowledge
Basic Aerodynamics
Flight Instruments
Human Factors
Navigation and Flight Planning
Meteorology
Air Law

You may find some subjects harder than others, which is why thorough study is important. The exam is multiple choice, and can be completed online. You are allocated 2 hours, and the pass mark is 70%.

To tackle my RPL exam, I set aside two hours of homework each night after class. It allowed me to iron out weak spots and plug up any knowledge gaps. If you have any questions (and you should), or are finding certain areas tricky, always contact your instructor. They are there to help you pass! I would also recommend completing some practice/mock exams beforehand so you get an idea of the exam format.

The exam will only cover things included in the theory syllabus. That said, sometimes a question can have more than one right answer. You should choose the answer that sounds MOST CORRECT. That might sound funny, but it’s not just a matter of recalling information from memory. It’s important that you display your understanding of concepts.

Private Pilot Licence (PPL) Theory Exam

The PPL exam will cover a wide range of navigation-based topics, as well as knowledge learned during RPL. So it pays to brush up on RPL knowledge as well. The PPL exam has 55-60 questions, varying between multiple-choice and single answer. The pass mark is 70% and you are allowed 3.5 hours.

Some questions offer up to 3 marks and require calculations. It’s vital to answer as many of the extra point questions correctly as possible, as they can ultimately make or break your campaign. These questions mostly relate to take-off and landing distances, weight and balance, density, height and pressure calculations.

It’s advantageous to memorise the formulas for these problems as an over-reliance on the flight computer could throw off your answer due to rounding errors. Flight mathematics must be precise. Slight variants will result in an incorrect answer. There’s no room for guesstimates!

You are allowed to take charts and materials into the examination, so you need to be organised. It’s a good idea to familiarise yourself with the region(s) depicted in the charts as they’re based in Sydney. Most navigation questions require you to draw on the chart.

My best advice here is to take it slow. You have a sufficient amount of time to complete the exam. Slow and steady does win the race. Keep it neat. You don’t want your charts to look like a doctors prescription pad! There’s a saying in the military that applies to exams:

“Slow is smooth, smooth is fast.”

I found that taking the AIP (Aeronautical Information Publication) into the exam didn’t help me. I referenced the Visual Flight Rules Guide (VFRG), and that covered all my bases. This is the only exam which allows you to carry the VFRG – which is concise and easy to follow.

Commercial Pilot Licence (CPL) Theory Exams

Since there are seven separate exams for the Commercial Pilot Licence (CPL), I will give a bit of overview advice. The last thing I want to do is overwhelm you. All exams except Aerodynamics, Aircraft General Knowledge (AGK) and Human Factors, require reference materials and tools to complete the questions.

For all exams, a sound knowledge of the basic concepts is paramount as you could get quizzed on anything. The difficulty for each exam can fluctuate wildly, depending on whom you talk to. I found Aerodynamics and Aircraft General Knowledge easy, while others struggled with these.

It’s worth taking other students’ reports on an exam with a grain of salt. Everyone will have their strengths and weaknesses within each subject. The best bet is to be prepared for anything! You can always set yourself a practice exam (what better way to spend a Saturday night!). For my preparation, I tackled each exercise in the Bob Tait books twice, ensuring I scored above 90% in my practice exams before considering myself ready for the real thing.

Preparing for exams is stressful and tiring. If you’re flying AND studying for your CPL exams, it’s worth reducing your flying time. It sounds like a drag, but this is one case where too much multi-tasking can be your downfall. Use the extra energy to find which study times and locations suit you best. Some work better at home, in the morning – while others may be able to concentrate at school during the afternoon.

For subjects like Navigation and Performance, there are various calculations and chart reading exercises. You will benefit from completing the practice exercises and familiarising yourself with the formulas and formations. Again, it’s important to remember that rounding errors can jeopardise your entire exam.

Conclusion

To conclude, all exam success relies on sound study. Practice, be prepared and remember to take your time. Slow is smooth. There are no shortcuts to aviation knowledge, and being ready for all-weather is a good rule for life and an even better theory for flying. Good luck!

Thank you to student pilot Howard Lau for contributing these tips on how to pass your pilot theory exams.

Pilot-Theory-Exams-Study
One of the best tips for how to pass your pilot theory exams is simply to study hard!

Chat to one of our flight training specialists to get your pilot training off the ground. Email [email protected]/en or go to https://drift.me/learntofly/meeting to book a meeting and school tour.

Learn-To-Fly-Melbourne-Youtube-Subscribe-Footer

Common Pilot Phrases: What Are The Pilot Phrases You Should Know?

Have you listened to the way a pilot speaks over the intercom? Can you make out everything they say? ICAO Aviation English is the universal language of aviation. It is used by pilots, air traffic control, aircraft maintenance engineers, technicians, airport crew, and airline and cabin staff. Like any language, there is a lot to learn, but knowing it well will make you a far better pilot. So what are some of the most common pilot phrases that you should know?

Clear Communication

Passing the radio communications exam is compulsory for all trainee pilots. A pilots role is to be fluent and knowledgeable in the various technical words and abbreviations. A pilot who can respond swiftly and accurately with an air traffic controller will significantly reduce the margin for error. In the air, mishearing can lead to a big mistake.

Some of the worst plane disasters occurred with confusion from the pronunciation of certain words. A pilot must not just break through the sound barrier, but the language barrier as well.

The Phonetic Alphabet

The NATO spelling alphabet that you may already know (Alpha = A and Bravo = B) was first developed by the International Civil Aviation Organisation (ICAO) after World War II. Like all languages, the phonetic alphabet can differ slightly around the globe. Certain Scandinavian countries have altered letters and added symbols. Some words in the NATO alphabet are spelt differently to assist with international pronunciations.

For example, ‘Alfa’ is spelt without the ‘ph’ because some European languages would not pronounce it as an ‘f’. ‘Juliett’ is given an extra ‘t’ for similar reasons because, in French, with Juliet a single ‘t’ is silent.

Common Pilot Phrases

AFFIRM

Don’t believe everything you saw on Top Gun! Pilots don’t say “affirmative” for ‘yes’ – the correct term is “AY-firm”.

APPROACH

A plane coming into land.

MAYDAY

This is one you never want to use. It’s the distress call for emergencies, such as a complete engine failure. It comes from the French ’m’ aidez’, meaning ‘help me.’ When in trouble, a pilot will say it three times.

MEL

Minimum Equipment List. This means a part of the aircraft has malfunctioned but is not of vital importance to the flight.

PAN-PAN

This is the next level of distress down from ‘Mayday’. Apply it situations which are severe but not life-threatening. Pan-pan originates from the French word ‘panne’, meaning a breakdown. Like ‘Mayday’ it is said three times at the start of a call.

ROGER

Contrary to popular belief, not all men who work in aviation are called Roger. This code-word confirms the pilot has received a message but not yet complied.

SQUAWK

To squawk is to set your transponder (the device for receiving a radio signal) so that your location can be identified on radar. Pilots may be asked to ‘squawk Mode – – Charlie’ or ‘squawk ident’, which are individual settings to allow air traffic control to locate a plane.

STANDBY

Meaning “please wait”, this is said when the air traffic controller or pilot is too busy to receive a message.

WILCO

An abbreviation of “will comply”, meaning the message has is received, and the pilot will comply. The phrase ‘Roger Wilco’ has made its way into more popular use, but technically, the ‘Wilco’ part is the more important.

So, read up on common pilot phrases! Then combine them with clear pronunciation and eager listening skills, and you are clear for takeoff.

Common-Pilot-Phrases
Knowing some common pilot phrases is a great start to mastering ICAO Aviation English.

For information on our flying courses, email [email protected]/en or go to https://drift.me/learntofly/meeting to book a meeting and school tour. You can also get more handy flying tips by clicking below and subscribing to our YouTube channel!
Learn-To-Fly-Melbourne-Youtube-Subscribe-Footer

A Successful Forced Landing: Case Study (Part 2)

The case study of the successful forced landing has proved that other than having the tremendous flying experience, pilots need to be determined and make quick decisions.

Forced landings are simulations that we do when we are down to 500 feet and when we punch the power and overshoot; however, in reality, if your engine fails, you are literally flying the final 500 feet to the ground without training. The instructor did have the fortune to go through specialised forced landing training and he shared some excellent tips to students.

How do you sustain the seat crash tolerance?

According to the Federal Aviation Administration (FAA) regulations, aircraft that are manufactured before 1987 only require a seat crash tolerance of 9Gs in all directions while for others all seats have to exceed that tolerance.

A Cessna 172R has crashworthiness of 26Gs. As the impact in the incident was actually around 5–6Gs, it can be easy to exceed limitations if you botch something.

Tips for a successful forced landing in this aircraft:

To keep the cabin intact during the impact, you do not only need to fly at the minimum controller airspeed, but also use dispensable parts of the airplane to take the impact for you, such as the wings, landing gears and even the engine.

The crash energy goes up with the square of airspeed and using other parts of the airplane structure can help reduce that crash energy safely.

If you were to use trees as the instructor did in this case study, you should aim to impact the trees as horizontally as possible as that will allow the trees to reduce your forward kinetic energy.

How do you deal with engine failures?

A crucial takeaway from this case study is that not all engine failures are the ‘propeller stops spinning’ scenario that you might see in a textbook.

Most engine failures are in fact partial power loss. Some partial power losses can sustain level flight but in the case of the pilot in the case study, he didn’t have the power to sustain level flight, so essentially he was in a slightly powered glide.

How do you measure the best glide speed?

Tips:

If your flight is too high, then fly faster, which will allow you to be less efficient and fall faster. You just have to have the technique to slow it down.

If you want to lose altitude and you are not on final approach on a forced landing yet, it is advisable to pitch the nose over to the white arc speed in order to lose height even quicker.

In the end, you have two options, either side-slipping or S-turns or even a combination of both.

Do not be timid on S-turns! The instructor in this case study flies extremely wide S-turns, which is the only way for them to be effective.

Hopefully, this entry can inspire you to get up and practice some forced landings and consider that the last 500 feet will be the real make or break moment! Have fun and fly safe!

To learn more about forced flying techniques, head to Forced Landings: An Alternative Technique. Thanks to LTF student pilot Howard Lau for contributing this case study on completing a successful forced landing.

Successful-Forced-Landing
Practicing successful forced landing technique can help to avoid a potentially life threatening situation.

For information on our flying courses, email [email protected]/en or go to https://drift.me/learntofly/meeting to book a meeting and school tour. You can also get more handy flying tips by clicking below and subscribing to our YouTube channel!
Learn-To-Fly-Melbourne-Youtube-Subscribe-Footer

How To Execute A Forced Landing: Case Study (Part 1)

The man who sent me on my first solo flight in Hong Kong is full of wisdom and has a sense of humour in the cockpit. He shared a flying experience involving a forced landing in a Cessna 152 with me. I want to share this story with you now as a case study along with tips that will guide you on how to execute a forced landing.

This is his story:

Tolo Harbour, Hong Kong, Approximately 2,800 Feet

On the 26th of February, like any other Sunday, I was sitting in the flight operation office in Hong Kong. Little did I know, out there in the Tolo Harbour, a Cessna 152 was about to be at the centre of a whirlwind adventure involving a forced landing.

At the time, we were doing some pre-examination exercises for students, and we had just turned around towards the Shek Kong Airfield. The engine suddenly ran rough, so I pulled the carb heat out and went full throttle, but it did not change the situation.

I was thinking, “Is this my lucky day? Alternatively, a bad day?”. But really, you don’t have time to think or even pray.

Decision Time

A decision had to be made in around 10 seconds. I had 3 options.

1. Go back to Shek Kong, but in that case, I would fly over Tai Po and many buildings.

2. Fly over to the dam wall (of the Plover Cove Reservoir), but it was 11.30am on a Sunday which means many people were there.

3. Fly towards Three Fathoms Cove.

I thought of those three options and discarded the first two options as they were too populated. Either way, today was the day for learning how to execute a forced landing.

Altitude

When you are at that height you will have less than two minutes before ground impact. I was thinking, “if I drag on too much or if I drag on too long, I wouldn’t have the altitude to execute my approach.”

At this point, I still didn’t want to believe that I had to do a forced landing, and I always wanted to revive the engine and glide back into the airfield. I asked ATC for approval to climb above the vertical limit, and they said, “Sure, no problem.”

The Engine Will Not Revive Itself. Decision Time Again.

You can’t spend too much time hoping to recover the engine. Run your checklists and if it isn’t working, make the decision to execute a forced landing.

The rule of the thumb here is to get a plan and stick with it. If you keep switching plans and your aircraft keeps descending, you will eventually limit your options for the forced landing too much, which is more likely to have serious consequences.

Forced Landing: Into The Trees On The Golf Course!

So how did I manage to land in the trees of the golf course without injuries? And moreover, why did I choose the trees?

I was trained to approach a field with an escape route to overshoot and go around in case something miraculously happens to the engine. The most important thing is that you have a technique to slow down. I can do S-turns to bleed off the height and shorten the landing distance, and side-slipping helps as well.

I was at 70 knots, nowhere near 60, and I was out of options at the time. If I dived the aircraft into the golf course, I would gather up speed, which may result in a tumble and getting wet. I spotted a relatively flat spot in the trees. I went for it. With full flaps, I hit the trees at around 45 knots, close to the minimum controllable airspeed.

Intentionally, I aimed between two branches so the wings would hopefully lessen the impact. And it did. The left-wing was broken off, but we walked away unhurt.

Head to Part 2 of this case study to see the lessons learnt and gain some tips on how to execute a forced landing. Thanks to LTF student pilot Howard Lau for contributing this case study on how to execute a forced landing.

Execute-Forced-Landing
Making fast decisions is an important factor in how to execute a forced landing.

For information on our flying courses, email [email protected]/en or go to https://drift.me/learntofly/meeting to book a meeting and school tour. You can also get more handy flying tips by clicking below and subscribing to our YouTube channel!
Learn-To-Fly-Melbourne-Youtube-Subscribe-Footer

Flying In Marginal Weather: A Student Pilot Experience

Flying in marginal weather with an experienced instructor is a great way to gain experience and build confidence. As an aviation student, you will regularly be placed in unfamiliar situations that test your skill, airmanship and decision making. These judgements could even determine the entire outcome of a flight. It is paramount for all pilots to attain a weather briefing for all matters of flying, including flying circuits.

The 24th of September, 2017, was a definitive learning curb and monumental day for me in my aviation career. What was supposed to be a regular day of circuit flying soon turned into an unforeseen challenge.

The weather was marginal on that day, with gusts up to 20 knots and some showers, as the outer rainbands of a tropical depression were affecting us here in Hong Kong. However, it seemed safe enough to fly circuits at first glance.

Fly with an instructor who is comfortable with flying in marginal weather

This will allow you to test your limitations safely.

After pre-flight, I immediately requested not to be sent out solo due to the weather. Nevertheless, my instructor and I decided that today would be a wonderful opportunity to test my abilities safely under his supervision.

My instructor was comfortable with the conditions; however, we were both aware of a squall line brewing to the south of Hong Kong that could potentially affect us. We calculated that we had at least 45 minutes before the line hit, and we assumed we would be in the clear.

Think beyond the aviation weather briefing

Interpreting the weather does not stop there. It’s vital that you can visualise how the forecast can potentially affect your flight.

Heels to the floor, full power, RPMs in range, Ts and Ps in the green and as the aircraft passed 55 knots; I gently applied backpressure for a smooth take-off.

Almost as soon as I climbed above the tree-lines, the aircraft jolted to the right, and I corrected instinctively. I remembered exactly how to respond during turbulence – focus on holding the altitude of the plane, don’t chase the altitude and most importantly don’t bust manoeuvring speed.

As I rolled out on downwind, the aircraft was thrown around in all directions. My body, with the absence of double shoulder harnesses, was also thrown around alongside as the rain and turbulence worsened. I struggled but managed to get my pre-landing checks complete and radio call out. Despite my headset bumping the ceiling, in such turbulence, one must remember that the priority is always to fly the aircraft.

Fly the attitudes. It will save your life one day!

The final approach was terrible, the turbulence made me delay my full flaps selection and I felt as if the aircraft was being tossed around. It occurred to me that I was way too flat as I flared so I applied more back pressure to establish a landing attitude. Even so, it turns out that I was way too fast. I hit and bounced, holding the landing attitude before touching down once again. The conditions weren’t easing, and I really began to worry.

The rain and turbulence escalated and my headset fell off. The instructor took over as I tried to collect myself. It appeared the squall line on the radar image I saw before the flight was going to hit. I voiced to my instructor and knew that this was going to be a full stop.

Plan for unforeseen delays. Anything can close the runway

Prepared and eager to land, I rolled out on downwind, least expecting flight operations to declare a runway closure for 5 minutes over the radio.

The rain became menacing as I flew at circuit height and held, pelting onto the windshield, and obscuring my visibility. My instructor, however, remained silent to test my decision-making skills for flying in marginal weather.

Waiting for the all-clear seemed like forever. Panic began to set in as I came too close to losing control. “Don’t chase the instruments and hold the attitude,” I reminded myself.

“The runway is now all clear”

Thank goodness. My instructor sprang into action and decided to help me with radios. On the base leg, I set the appropriate attitude for 75 knots and trimmed—I feel very fortunate to be taught how to fly attitudes instead of chasing airspeed, the emphasis on attitude flying by Learn to Fly helped immensely.

Just as I was about to turn final, 75 knots plummeted to only 65 and I sank like a rock. I just had a wind shear of a 10-knot loss. Immediately I applied full power and performed a go-around.

On final approach, I focused on just flying by feel. The landing was hard; however, being back on the ground was all that mattered.

“A superior pilot uses his superior judgement to avoid situations which require the use of his superior skill” – Frank Borman, NASA Astronaut, Commander of Apollo 8

Fifteen minutes after landing, the squall line came through with heavy thunder and rain. It was at this moment I realised the outcome of today’s flight was merely a testament to my good judgement under pressure in a difficult situation. My instructor and I were both safe after I made the decision to call it off. It reiterated to me that as a student, we have the right to make a no-go decision! Because despite embracing every ounce of optimism, even for the simplest of tasks, it won’t change the weather outcome.

This flying in marginal weather experience strengthened my decision-making skills and confidence as a pilot. Contributed by LTF student Horace Ho.

Flying-in-Marginal-Weather
Flying in marginal weather with an experienced instructor is a great way to gain experience and build confidence.

For information on our flying courses, email [email protected]/en or go to https://drift.me/learntofly/meeting to book a meeting and school tour. You can also get more handy flying tips by clicking below and subscribing to our YouTube channel!
Learn-To-Fly-Melbourne-Youtube-Subscribe-Footer

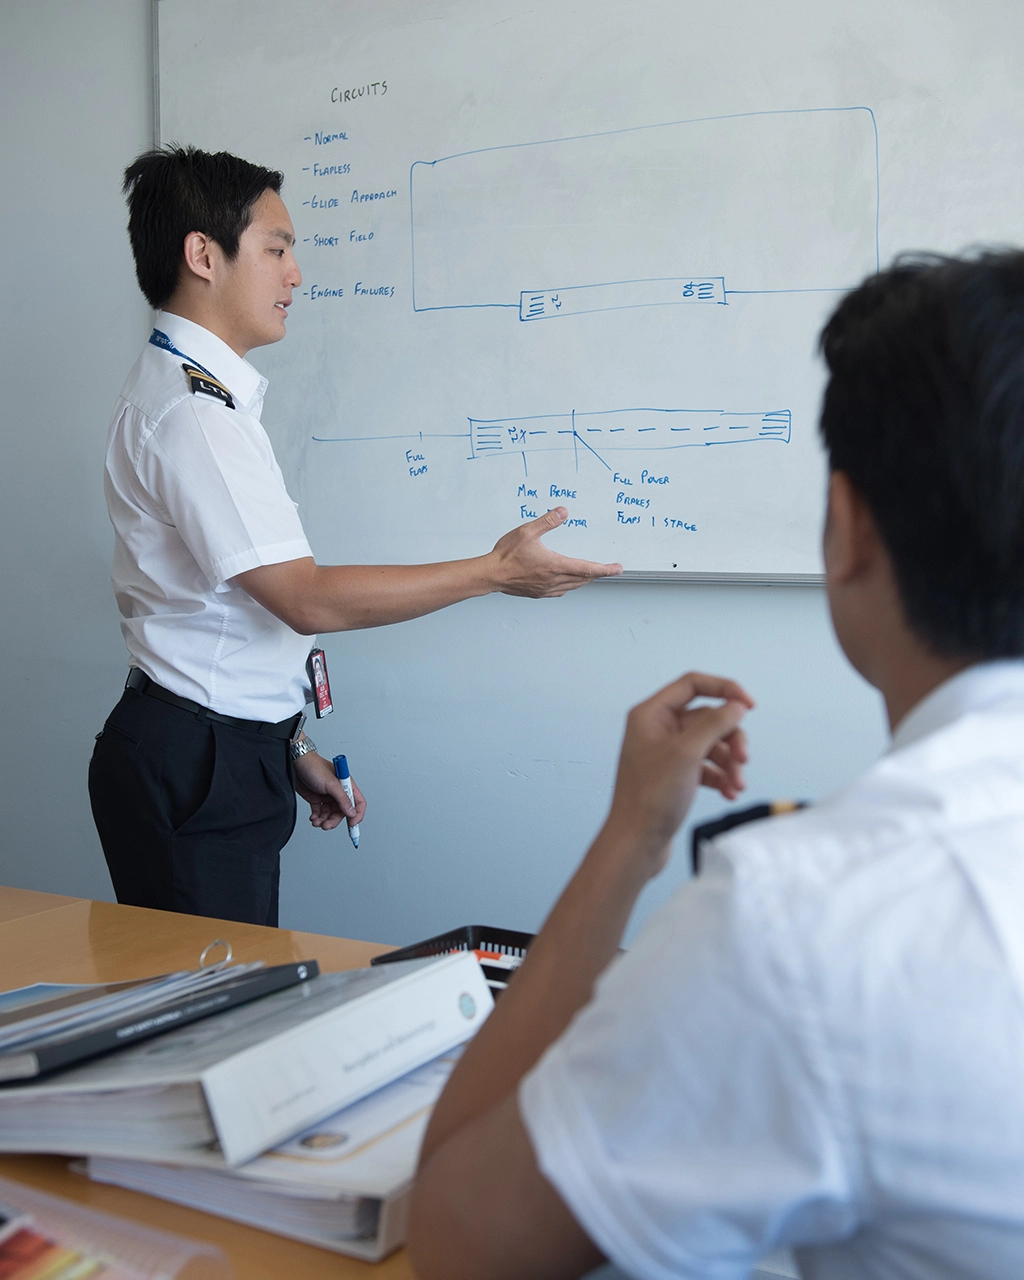
Passing The Recreational Pilot Licence (RPL) Flight Test

Every professional pilot once undertook and passed their Recreational Pilot Licence (RPL) flight test. You’ve completed your theory and your flight training, and your instructor has told you that you are ready. But what should you prepare for in order to pass the test with flying colours?

On the day of the test, the CASA-approved testing officer will sit with you and run through how they will be grading you. It may seem daunting, but don’t stress, going for and passing your Recreational Pilot Licence flight test really isn’t as scary as you make it out to be. Plus, it’s all based on knowledge and skills that you have already demonstrated.

In-flight, your testing officer will want to see how you can demonstrate the following:

1. Steep turn through 360 degrees and back onto the original heading

The best way to do this is to make sure you give a thorough lookout to ensure you are in the clear before the turn. When you’re ready, hold the required amount of back pressure on the control stick so as to stay more or less the same altitude or level out in anticipation as you come back upon your original heading.

2. Stall recovery

For this part of the test, your testing officer will want you to demonstrate stall in various configurations. Make sure you remember the HASELL checks—Height, Airframe, Security, Engine, Location, Lookout—and know how to identify the symptoms before entering a stall.

Your instructor may also ask you to demonstrate how to recover a stall with a wing drop. If you make sure to use rudder rather than the ailerons, in the opposite direction of the dropped wing, you’ll be fine!

3. Forced landing

An integral part of flying – and your responsibility – is to be prepared for anything. To make a forced landing successfully, maintain control of the aircraft and select the suitable field. It is important to carry out all emergency checks. Conduct the passenger brief and mayday call, and always make sure to reassure the “passengers” that you are a trusted pilot and have been trained to handle emergency situations.

4. Instrument flying

The testing officer will want to see your demonstrated ability to fly on instruments alone under the hood. To do so, ensure you stay within the +/- 100 of the requested altitude and +/- 10 of the requested heading.

5. Circuit flying

The final part of passing your RPL flight test will have you demonstrate how to fly a squared circuit pattern and control your speed and altitude when doing so. Make sure you can also land the plane with different approach configurations, and manage engine failure after take-off and in the circuit.

Remember your inbound radio calls as you return to Moorabbin Airport’s control zone, and congratulations, you’ve completed the test.

After passing the RPL flight test and obtaining their RPL, students are qualified to fly within 25 nautical miles of the departure airport and carry passengers, during daylight in good weather (VFR) conditions.

Remember that every professional pilot was once a student, itching to achieve their next milestone. Bombarding their flight instructors with questions about how many flying hours it would take for them to reach their First Solo, Training Area Solo, RPLPPL and finally, CPL.

However, we know that while flying itself is a great adrenaline rush, you shouldn’t be in a rush when learning and attempting your exams. If you mess up any part of the RPL flight test, remember that it won’t be the end of the world. You will always be able to have another go.

Student-Pilot-Checklist
Remember your checklists! They are crucial to successfully passing your RPL flight test.

For more information on our RPL course, email [email protected]/en or go to https://drift.me/learntofly/meeting to book a meeting and school tour. You can also get more handy flying tips by clicking below and subscribing to our YouTube channel!
Learn-To-Fly-Melbourne-Youtube-Subscribe-Footer

Aircraft Forced Landing Techniques

A situation that requires a forced landing is something that most pilots would rather not experience while flying. But the reality is, that while uncommon, it could happen at any time. It’s a pilot’s job to be prepared. Like anything, practice makes perfect. In this blog we look at aircraft forced landing techniques.

To complicate things a little, there are a couple of different aircraft forced landing techniques a pilot may be instructed to follow. Knowing them all gives you more flexibility to make the right decision should the need arise. Lets take a look at both the traditional and alternative methods.

Traditional High Key / Low Key Forced Landing Technique

The High Key /Low Key technique is the method traditionally taught in most civilian flying schools across the world. This technique depends on your judgement of the trajectory of the flight in order to hit 1500 feet by your low key position, which is normally abeam your IAP (Initial Aiming Point) on a downwind.

Forced-Landing-Technique-High-Key-Low-Key
The High Key / Low Key method is the most commonly taught of the aircraft forced landing techniques

Some believe this technique to be somewhat flawed. There are a lot of factors to process in order to clearly judge the altitude of your aircraft in a glide at a particular arbitrary point. It also requires the pilot to be extremely knowledgeable about surrounding terrains and the elevation of the terrain they are flying over, which sometimes can be challenging.

Constant Aspect Technique

The Royal Air Force has developed a newer method, known as the Constant Aspect Technique. This method combats the issues of different aircraft, and the requirements for some undetermined judgements.

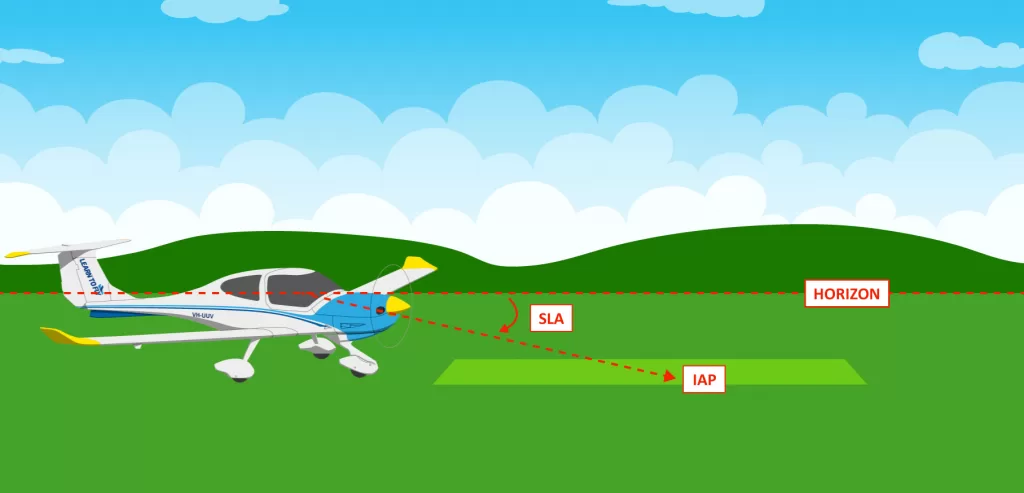
The principle of this aircraft forced landing technique is that it removes all the guessing of altitude and descent angle. It narrows down to one thing, which is called the “Sight Line Angle” or SLA. It is the perceived angle between the IAP of your landing field and the horizon.

Realistically, all you can look at during the forced landing with this technique is airspeed and the SLA.

Forced-Landing-Technique-SLA
The “Sight Line Angle” or SLA is the perceived angle between the horizon and the IAP of your chosen landing field.

The SLA is the “Aspect” which is part of this entire forced landing approach, and the “Constant” is basically the entire technique itself. The ultimate goal of the entire pattern is to keep your SLA constant as you approach the IAP.

How To Conduct The Constant Aspect Technique

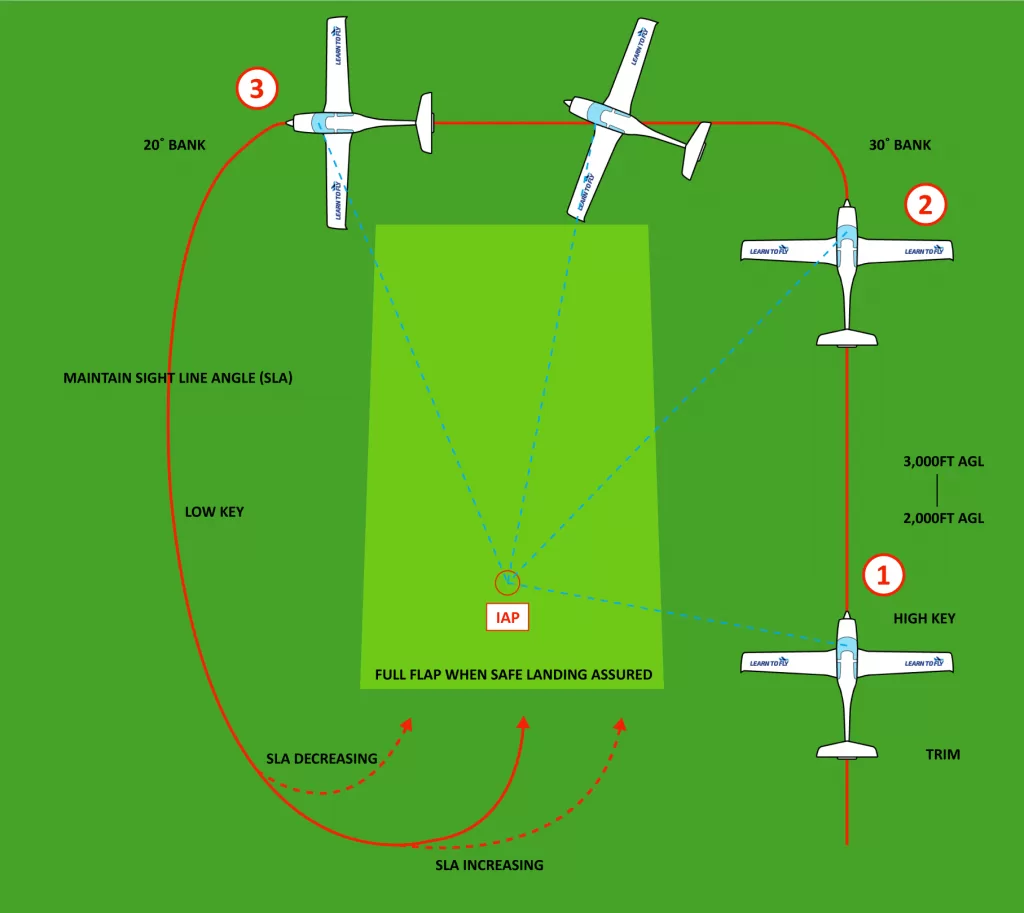
The first step to fly this approach is to pick a landing field within safe gliding distance and meet the criteria set out by your instructor. Next, you can choose a sensible IAP within the first third of your landing field. This will be the “fulcrum” where your aircraft will pivot during the entire pattern, which ideally is a round pattern unlike the High/Low Key method with a rectangular pattern.

Forced-Landing-Constant-Aspect-Technique
The Constant Aspect Technique is one of the newer aircraft forced landing techniques.

Ideally, you will join what is equivalent to a crosswind. However, depending on wind direction, it may be a direct downwind or a midfielder crosswind join into the “circuit”. It is important that your bank angle does not exceed 20 degrees during the approach. Otherwise, you may risk the SLA either increasing or losing airspeed and glide ratio due to the reduced vertical component of lift and increased drag.

If your SLA is increasing (getting too high), deviate from best glide speed or increase spacing.

If your SLA is decreasing (getting too low), decrease spacing, fly inwards.

When approaching final, you must make the turn in to directly approach your IAP. This is the time when you decide, using your knowledge of the trend of your SLA, whether you:

1. Cut in short

2. Fly a standard final, or

3. Overshoot and then turn back onto final depending on your height.

If the SLA is high, you have three options to get back onto glide path. You can use flaps, do S-turns or do a steep slip, or you can combine S-turns and steep slips if it is ridiculously high.

This technique is not only used by RAF but also being slowly accepted by flying schools around Europe and the UK.

It is recommended that everyone should practice the entire pattern all the way down into the flare and touchdown. You will find out, if you really are ridiculously high, you can still hold the slip into the flare, centralise the rudder when the aircraft sinks, and then continue to flare.

Experiment With Aircraft Forced Landing Techniques

Chat to your flight instructor about which method they prefer and why. Proactively seek to practice both aircraft forced landing techniques, so that you know which one you feel more comfortable with.

Thanks to LTF student pilot Howard Lau for contributing this article on aircraft forced landing techniques. For information on our flying courses, email [email protected]/en or go to https://drift.me/learntofly/meeting to book a meeting and school tour. You can also get more handy flying tips by clicking below and subscribing to our YouTube channel!
Learn-To-Fly-Melbourne-Youtube-Subscribe-Footer

How Flying Critical Incidents Can Occur

When an aircraft flying under Visual Flight Rules (VFR) enters Instrument Meteorological Conditions (IMC), flying critical incidents can sometimes occur. In most cases, this is due to reduced visibility or inadvertent entry into clouds. Both of which happen because of the loss of the natural horizon.

Unfortunately, such flying critical incidents have cost the lives of many pilots.

You hope it will never happen to you

Before I began my pilot journey, I always seemed to find the time to read unfortunate accident reports where a non-instrument rated pilot on a VFR flight enters IMC. It is even more unfortunate to realise that many of these incidents become fatal accidents. The more I’ve read, the more I’ve tried to make myself believe, ‘It will never happen to me!’

For non-pilots, all of these accidents seem preventable. Reading the Terminal Area Forecast (TAF) and good weather knowledge are all valid and effective strategies to combat any similar occurrence from happening. However, today I will write about a time when this happened to me on a training flight, nonetheless with an experienced instructor on board.

The importance of sharing stories

Before undertaking the task of writing it, I had been wondering about whether or not I should really share my story. However, I made the decision to do so knowing it could help educate other pilots and student pilots about when flying critical incidents can occur.

Cloudy conditions and lower visibility

It was a very cold morning after a cold front came through the day before. I checked the METAR of Hong Kong International Airport and the forecast indicated cloud covers clearing and rising to 2500 feet with 9 kilometres of visibility. However, as I arrived in the flight operations office, we received PIREPs from other pilots of temporary visibility reduction to an estimate of fewer than 3 kilometres near the high ground. I knew this could become an issue upon exiting the airfield area into the training area via a gap in the mountains.

The aircraft from previous slots were rocking the circuit and about to finalise their return. Skies above Shek Kong Airfield were clearing and let in some warm sunlight. However, the area towards the exit route (Kadoorie Gap) into the training area was still rather cloudy. I saw clouds on the other side of the mountains and thought this could really be an issue for our flight today – we had some instrument flying planned.

Climbing to 1500 feet

My instructor had nearly 40 years’ experience in the UK as an aerobatic pilot and warbird pilot. He also holds an Instrument Rating – Restricted on his CAA license – although on his Hong Kong license he does not hold such rating. Even so, his instructor rating allows him to teach basic instrument flying and tracking. On this day, despite the clouds, I put my trust in his judgement and was well aware of his capabilities since we had flown together numerous times.

We taxied out to the runway after our run-up checks, only to notice something very strange. Our slot was supposedly fully booked out with our entire fleet expected to fly. However, there was no action on the aircraft apron. I recall looking to my right as I prepared to shift into full power for takeoff and witnessing all the aircraft sitting idly, waiting for the weather to clear. Still, I thought there was no time to waste and we took off.

We climbed to 1500 feet and tracked towards the exit. As soon as we switched frequencies for traffic information service we heard a rescue helicopter saying, “Visibility deteriorating to less than 3000 meters.” I wasn’t sure where the helicopter was, but in retrospect, it really should’ve been the warning to turn back. We pressed on and exited out of the mountain gap and went on to “the other side,” where all the nasty clouds were, maintaining 1500 feet all the way through.

Scary in-flight sights

As soon as the mountains disappeared from my peripheral vision, my instructor and I realised that visibility was not 9 kilometres, as we had initially projected, and I could only see what was in front of us by looking downwards.

The only visibility I had was of the ground below, including the roads, trees and buildings of Tai Po. I looked back and realised that our only escape route back to the airfield would be obscured if we kept going. Just as I was about to turn back, it became apparent that my instructor had the same idea in mind. “Bring us back,” he said.

Returning through the mountain gap

The direction indicator on that particular Cessna 172 was somewhat defective. This meant I started my timer on my watch and began a rate one turn to the left. I timed for 1 minute, which at 3 degrees a second would be a full 180-degree turn. Fortunately, the mountain gap remained in view this entire time and I instinctively throttled up to return quickly. We were pushed even lower as we entered the airfield airspace, finally descending to 1300 feet. It was very uncomfortable watching the mountains on either side of me come so painfully close.

Lessons learnt

Of course, we were fortunate that despite this being a VFR into IMC incident. The visibility was still sufficient for a safe turn-back manoeuvre.

Among the contributing factors to the success of this was the expertise of my instructor, who holds a restricted instrument rating in the UK, and the fact that at this time I had already completed an hour of instrument flight training. A serious lesson in how flying critical incidents can occur.

After landing, and during the debrief, we narrowed the causes down to the ‘get-there-itis’ that occurred as a result of wanting to squeeze more instrument flying time in for me and also the fact that my instructor was instrument-rated and we put such confidence in his expertise. In retrospect, we shouldn’t have even left the ground in the first place.

This flying incident is proof that pilots with any amount of experience can be sucked into this veil of complacency. They then can make decisions which go against rational and safer judgement. It is an incident my instructor and I will both go on to remember.

Safe flying everyone!

Flying-Critical-Incidents
When an aircraft flying under Visual Flight Rules (VFR) enters Instrument Meteorological Conditions (IMC), flying critical incidents can occur.

Thanks to LTF student pilot Howard Lau for contributing this article on how flying critical incidents can occur. For information on our flying courses, email [email protected]/en or go to https://drift.me/learntofly/meeting to book a meeting and school tour. You can also get more handy flying tips by clicking below and subscribing to our YouTube channel!
Learn-To-Fly-Melbourne-Youtube-Subscribe-Footer

Final Flight Departure Procedures: Flight Departure Processes Part 3

In this blog series on flight departure processes we have covered engine starts, taxi checks, run-up checks and more. Now it’s time to run through the final flight departure procedures and take to the skies!

Use the TMPFISCH acronym

The proper acronym that applies whenever holding short is TMPFISCH, and it is what I usually use for my operations here in Hong Kong. It goes like this:

T – Trims set to the appropriate take-off position

M – Mixture rich, master on and magnetos on both

P – Primer in and locked (or fuel pump off)

F – Fuel is sufficient for the coming flight and flaps are set

I – Instruments’ Ts and Ps are in the green range

S – Switches (landing and strobe lights on)

C – Controls full and free

H – Hatches secure and harnesses secure

When you do your controls part of this departure check, make sure your box the controls. That means to move the controls in a movement of a box and ensure you have still got adequate freedom of movement. You might have a mile-long taxi, and something might have jammed the controls. Never skip this check as part of your final flight departure procedures.

Deliver your safety brief

You can do the EFATO brief (Engine Failure After Take-Off ) at any stage before the take-off, but I typically do it after run-ups. A typical brief should describe the actions that need to happen in the event of an engine failure at particular stages of the flight, such as:

During take-off

After rotation

Below 200 feet and with runway remaining

Above 200 feet with no runway remaining

Above 700 feet.

The brief goes something like this:

“If we have an engine failure on the ground, we stay on the ground. If we have an engine failure below 200 feet, we land on the remaining runway. If we have an engine failure above 200 feet, we land straight ahead or 30 degrees to the side. If we have an engine failure above 700 feet, we will turn back to find runway X.”

On a standard Cessna or Sling, 700 feet is plenty for a runway turn-back manoeuvre. However, during the turn back you MUST lower the nose to maintain airspeed and limit the angle of bank to 45 degrees. Never attempt a runway turn-back if an engine failure occurs below 700 feet!

Ready to go

You are lined up on the runway, and ready to take to the skies. It’as always an exciting moment for any pilot. However, discipline must be maintained during the final flight departure procedures.

Ensure you are on the correct runway by looking at your directional gyro, which will indicate the proper runway heading. It’s also a good practice to cross-check this reading with the magnetic compass as well. After that, you should triple-check with making sure that the runway numbers are indeed the intended runway. Everything checks out? Good.

Time to fly!

Now the take-off roll can begin. Ensure that your heels are on the floor and that you are controlling rudders only with the balls of your feet; this will ensure that you do not inadvertently apply the brakes! After you complete this, you should use full power – smoothly but with purpose – and count three, one-thousands before going all the way with to full strength.

After full power is applied, check on the RPM. They should be reading at or above the stated minimum static full-throttle RPM. At this stage, you should also check the oil temperatures and pressures and ensure that these are still sitting within the green range. Finally, you should check to ensure that the airspeed indicator is ‘alive’, meaning that it is indicating an acceleration.

At rotation speed, gradually apply back pressure and lift the nose wheel off the ground, allow the aircraft to fly off the runway and then adopt a Vy (best rate of climb) attitude to ensure maximum climb performance. Look outside! Once you are above 300 feet AGL and obstacles are cleared, move the flaps to up and auxiliary fuel pump (if applicable) to off. You should once again check the oil temperatures and pressures.

The result of following the correct final flight departure procedures? A smooth take-off, followed by another safe and beautiful flight!

Thank you to student pilot Howard Lau for contributing this great series on flight departure procedures.

IMSAFE-For-Pilots
With the final flight departure procedures done, it’s time to fly!

Find out what it feels like to take to the sky! Email [email protected] or visit https://drift.me/learntofly/meeting to book a meeting and school tour.
Learn-To-Fly-Melbourne-Youtube-Subscribe-Footer